May 2, 2024

Why You Should Not Dye Your Hair at Home

Why You Should Not Dye Your Hair at Home

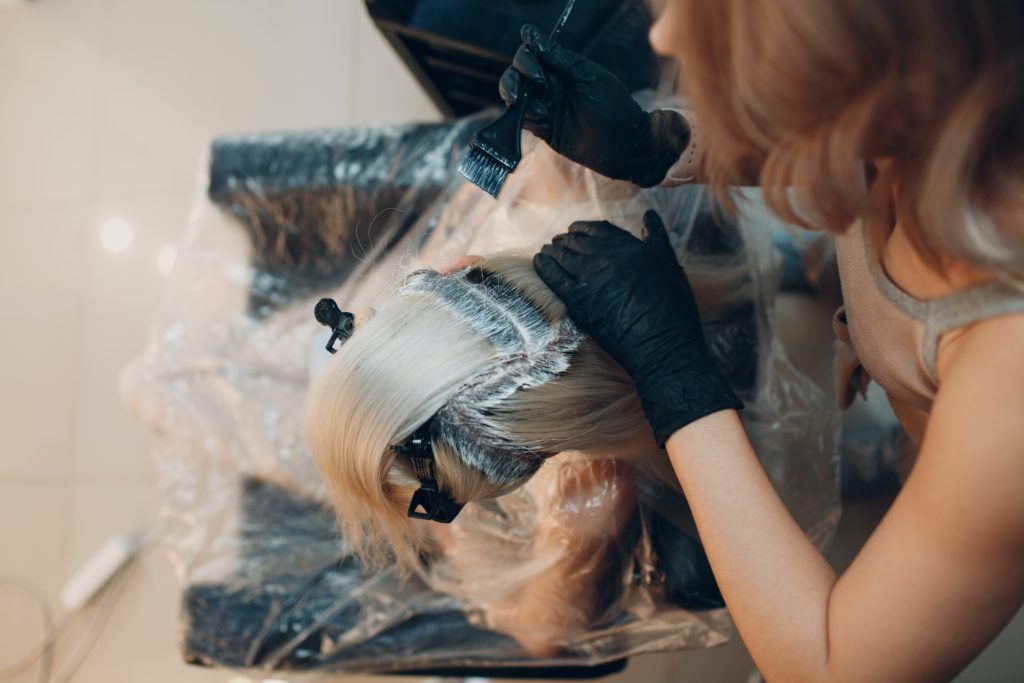
For many of us, our hair is a defining characteristic that we take pride in. Whether it’s our natural hair color or something we’ve experimented with, our hair can be a reflection of our personality and style. And with the growing popularity of DIY beauty trends, it’s no surprise that more and more people are attempting to dye their hair at home. However, there are many reasons why you should think twice before taking on this task yourself. In this article, we’ll explore the dangers of dyeing your hair at home and the importance of seeking out a professional hair colorist. 1. Lack of Professional Expertise One of the main reasons why dyeing your hair at home can be dangerous is because of the lack of professional expertise. A professional hair colorist has undergone extensive training and has a deep understanding of hair types and textures, as well as the chemicals involved in hair dyeing. Without this knowledge, it can be difficult to know which products are safe to use and how to apply them correctly. This can lead to serious damage to your hair and scalp. Additionally, a professional hair colorist will be able to recommend the best color and style for your hair, taking into account your skin tone and natural hair color. They will also be able to recommend the appropriate after-care routine to keep your hair healthy and vibrant. Importance of Understanding Hair Types and Textures Every person’s hair is unique, and it’s important to understand the different types and textures before attempting to dye it at home. For example, coarse hair will require a different approach to dyeing than fine hair, and curly hair will need to be treated differently than straight hair. Without this knowledge, it’s easy to make mistakes that can lead to serious damage, such as breakage, split ends, and hair fall. Risks Involved in Dyeing Hair at Home There are many risks involved in dyeing your hair at home, including the risk of chemical burns, allergic reactions, and hair damage. Hair dye contains harsh chemicals that can be dangerous if not used correctly. Additionally, if the dye is left on for too long or if the color is not applied evenly, it can lead to patchy and uneven results. This can be costly and time-consuming to correct and can even result in the need to cut off the damaged hair. 2. Potential for Uneven Coloring Achieving even hair color is a difficult task, and it’s even more challenging when attempting to do it at home. Without the proper tools and expertise, it’s easy to miss spots or apply too much dye in certain areas. This can result in patchy and uneven coloring, which can be difficult and costly to fix. In some cases, it may even require the services of a professional hair colorist to correct the mistakes. 3. Damage to Hair Health The chemicals in hair dye can be incredibly damaging to your hair health, especially if they are not used correctly. Overuse or misuse of hair dye can lead to breakage, split ends, and hair fall. Additionally, if the dye is left on for too long, it can lead to a dry and brittle texture. This can be especially damaging to those with already dry or damaged hair. Importance of Proper After-Care Routine Proper after-care is essential to maintaining healthy hair after dyeing it. This includes using the right products and avoiding harsh chemicals and heat styling tools. A professional hair colorist will be able to recommend the best after-care routine for your hair type and texture. They will also be able to recommend products that will help maintain the vibrancy and health of your hair. The Importance of Proper Tools and Equipment Another important aspect of dyeing your hair at home is using the proper tools and equipment. This includes measuring cups, gloves, and applicator brushes. Using improper tools and equipment can lead to uneven coloring and can even result in serious damage to your hair and scalp. For example, using metal brushes can cause your hair to break, and using a plastic shower cap instead of a professional-grade cap can lead to uneven coloring. Additionally, using the wrong type of developer or mixing the wrong proportions of dye and developer can also lead to serious damage. This is why having the proper tools and equipment is essential when dyeing your hair at home. Conclusion Dyeing your hair at home can be a tempting option, especially with the growing popularity of DIY beauty trends. However, it’s important to understand the risks involved and the importance of seeking out a professional hair colorist. Without professional expertise, it’s easy to make mistakes that can lead to serious damage, including breakage, split ends, and hair fall. Additionally, the chemicals in hair dye can be dangerous if not used correctly and can lead to allergic reactions and chemical burns. To maintain the health and vibrancy of your hair, it’s essential to use the proper tools and equipment and to follow a proper after-care routine. And when it comes to achieving the perfect color, it’s best to leave it in the hands of a professional. FAQs 1. Is it safe to dye your hair at home? Dyeing your hair at home can be dangerous if not done correctly. The chemicals in hair dye can be harsh and can lead to serious damage if not used properly. Additionally, without professional expertise, it can be difficult to achieve even coloring and avoid mistakes that can lead to hair damage. 2. What are the risks of dyeing your hair at home? The risks of dyeing your hair at home include chemical burns, allergic reactions, hair damage, and uneven coloring. Additionally, using improper tools and equipment can lead to serious damage to your hair and scalp. 3. What is the best way to dye your hair? The best way to dye your hair is to seek out a professional hair colorist. They have the knowledge and

Why You Should Not Dye Your Hair at Home Read More »

how to properly groom brows

How to Properly Groom Brows

For many of us, eyebrows are a crucial part of our beauty routine, and keeping them well-groomed is a must. However, with so many techniques and products available, it can be overwhelming to figure out how to groom brows properly.  Finding the right technique to maintain the perfect shape can be challenging. But fear not! This guide will explore the best practices and tools for proper eyebrow grooming to achieve the perfect arches you’ve always dreamed of. Determine Your Eyebrow Shape Determining your eyebrow shape is an essential step in properly grooming your brows. The right eyebrow shape can enhance your natural beauty, frame your eyes, and even make you look younger. Here are some guidelines to help you determine the best eyebrow shape for your face: 1. Know Your Face Shape Different eyebrow shapes work best with different face shapes. For example, a round face may benefit from a more angular, arched eyebrow shape to help elongate the face. On the other hand, a square face shape may benefit from a softer, rounded eyebrow shape to help soften the angles of the face. 2. Consider Your Natural Eyebrow Shape Your natural eyebrow shape can provide a good starting point for determining the best shape for your face. Look closely at your eyebrows and consider their natural arch, thickness, and length. This can help you determine how much to pluck, where to shape, and where to leave hair. 3. Use a Ruler or Pencil Using a ruler or pencil can help you determine where your eyebrows should start, arch, and end. Hold a ruler vertically against the outer edge of your nose and the inner corner of your eye to determine where your eyebrow should start.  Then, hold the ruler at a diagonal from the outer edge of your nose to the outer corner of your eye to determine where your eyebrow should arch. Finally, hold the ruler from the outer edge of your nose to the outer corner of your eye to determine where your eyebrow should end. 4. Seek Professional Advice If you’re unsure about the best eyebrow shape for your face, seeking professional advice may be helpful. A trained aesthetician or makeup artist can help determine the best shape for your face and guide how to achieve that shape. How to Groom Eyebrows Properly grooming eyebrows is an essential part of a well-groomed appearance. Grooming eyebrows involves shaping and maintaining the natural shape of your brows. There are several ways to groom eyebrows, including trimming, tweezing, waxing, and threading. Below are some tips on how to properly groom your eyebrows using each of these methods. A. Trimming Trimming your eyebrows involves cutting any excess hair that may be longer than the rest of your eyebrows. To do this, use a small pair of scissors or an eyebrow razor. Brush the eyebrow hair upwards with a clean mascara wand or spoolie brush, then trim the hair that is sticking out above the brow line. Be careful not to cut too much hair at once, as it can create a bald spot. B. Tweezing Tweezing is the most common method of grooming eyebrows. It involves plucking hair from the root with a pair of tweezers. To get started, brush your eyebrow hair upwards with a spoolie brush or mascara wand. Use a white pencil or powder to outline the shape of your eyebrows, then tweeze any stray hairs outside of the outline. Always tweeze in the direction of hair growth, and avoid over-tweezing. C. Waxing Waxing is another popular method of grooming eyebrows. This involves applying warm wax to the unwanted hair, and then pulling it off with a strip of cloth. It’s important to follow the directions carefully when using a wax kit, as wax can be hot and potentially cause burns. It’s also important to avoid using wax on sensitive skin, as it can cause irritation. D. Threading Threading is a traditional method of grooming eyebrows that involves using a piece of thread to remove hair. To do this, twist a piece of thread into a loop, then move the loop back and forth along the hair you want to remove. The hair will become trapped in the thread and be removed from the root. Threading can be more precise than tweezing, but it can also be more painful. Maintaining the Shape of Eyebrows Maintaining the shape of your eyebrows is crucial for keeping them looking neat, polished, and symmetrical. The shape of your eyebrows can significantly enhance your facial features, and a well-groomed pair of brows can make a big difference in your overall appearance. Here are some tips for maintaining the shape of your eyebrows: Enhancing Eyebrows Enhancing eyebrows is an effective way to define and emphasize your facial features. Here are some ways to enhance your eyebrows: Mistakes to Avoid When Grooming Eyebrows Grooming eyebrows is an important aspect of personal grooming, but there are some common mistakes that people make that can result in less-than-desirable outcomes. Here are some of the mistakes to avoid when grooming eyebrows: A. Over-Tweezing This is one of the most common mistakes people make when grooming their eyebrows. It’s important to remember that eyebrows are meant to frame the face, and over-tweezing can lead to an unnatural look. It’s best to only tweeze stray hairs and avoid removing too much from the natural shape of your eyebrows. B. Not Knowing When to Stop It can be easy to get carried away when grooming eyebrows, but it’s important to know when to stop. Keep in mind that eyebrows are not identical, and trying to make them perfectly symmetrical can result in over-grooming and an unnatural look. C. Using the Wrong Tools Using the wrong tools can lead to ineffective grooming and even injury. It’s important to use sharp, slanted tweezers for precise grooming and sharp scissors for trimming. Avoid using old or dull tools that can cause pain or irritation. D. Ignoring the Natural Shape of Your Eyebrows

How to Properly Groom Brows Read More »

writing pinterest descriptions

How to Write the Best Pinterest Descriptions for Boards and Pins

We’ve got you covered if you’re asking about best practices as to how to create the finest Pinterest Board & Pin descriptions! It’s an art and a science, just like everything else on Pinterest. When the art is done well, it appeals to a reader’s emotions, problems, and future aspirations. Your Pinterest SEO will improve as you grasp the science. This leads to increased distribution and website traffic. This blog will go through how to create Pinterest descriptions for Pins and Boards. In addition, we discuss why they are so crucial for engagement, traffic, and the Pinterest search engine! What Pinterest Descriptions Are and Why They Matter Simply, Pinterest descriptions offer your Boards and Pins additional context. They provide Pinterest users an idea of the kind of material that will be pinned to your Boards or what your Pin is about! Pinterest Pin descriptions appear in slightly different places depending on whether you use the desktop or mobile version. When you pick your Pin description on the desktop, it will show to the right of your Pin picture. The description shows underneath the Pin picture, directly after your Pin Title, on Pinterest mobile. Pinterest Board descriptions are displayed at your Pinterest board’s top, just beneath your profile picture. This section informs your followers about the contents of your Board and the kind of Pins you’ll be posting to it. Now that you know where to look for these descriptions and what they’re meant to achieve, let’s discuss why creating excellent Pinterest descriptions is so crucial. In 2018, Pinterest conducted a study of 21,000 Pins. They examined Pin designs and descriptions, and what they discovered will astound you! Here are just a few examples: Descriptions clearly matter to Pinterest users. And, as it turns out, they are important to the Pinterest algorithm as well! Pin descriptions are critical for Pin distribution. By including relevant keywords (that relate to the page you’re linking to) in your Pinterest Pin description as well as the Board title and description where the Pin is saved, you’re sending a signal to Pinterest about your content (think: Pinterest SEO!) These keyword signals in your Pin title, Pin description, Board Title, and Board Description assist Pinterest in surfacing your Pin to the right people and search results. Use just relevant keywords, not random unrelated terms, as Google does. You don’t want to get reported for spam on Pinterest! How Can I Find Out Why My Pinterest Descriptions Are Missing? If Pinterest Pin descriptions are so important, why are they missing half of the time? They appear sometimes on mobile but not on desktop. Or you may see them on certain Pins but not on others. You may see them on some accounts but not others if you handle many accounts for customers. It’s really rather common. Pinterest has the following to say: “Your descriptions may change depending on the Pin format and device.” People will occasionally see the complete description in their feed, but other times they may just see the Pin title or a few words of the description. Whatever appears in people’s feeds, know that your description is hard at work behind the scenes to deliver your content in front of the correct people.” How to Create Outstanding Pinterest Pin Descriptions Let’s discuss Pinterest description best practices and how to write them for your Pins! You’ll see a box for Pin description whether you post a pin-straight to Pinterest or schedule a Pin using Tailwind. It’s the “Tell everyone what your Pin is about” form to the right of the Pin picture field on Pinterest. In terms of what to add to your Pin description, you should include anything that will assist others to determine whether your Pin is relevant to them. The more specifics, the better. Your pin description should include the following information: What is the Maximum Length of the Pin Description? Your Pin description can be up to 500 characters long. That’s plenty of room for natural keyword use, a CTA, and all the information people need to know about what your Pin and linked content can do for them. The first 30-60 characters of your description are most likely to appear in the feed. Start with the most important and compelling parts. Understanding the components of a strong Pin description is useful, but how does that translate into writing an effective description? This template is an easy approach to think about constructing your Pin description: [Address Keyword Search Intent] + [Brand Name] + [What You Offer] + [Relevant Details] + [CTA] Consider the following scenarios, one for each of the four goals: awareness, email signups, online sales, and offline sales. Writing Pinterest Board Descriptions Pinterest Board descriptions will be a snap now that you’ve mastered Pinterest Pin descriptions! Board descriptions, like Pin descriptions, have a character limit of 500. To add a Pinterest Board description, go to the Board you want to describe and choose the Edit option (pencil icon). Then, in the area under “What’s your board about?” provide your Board description. How to Add a Description to a Pinterest Board Your board description should include the following information: Pinterest users search for a combination of specialist, wide, and long-tail keywords and phrases (“how to do XXXX”). For example; [Keywords] + [Why Should You Care] + [What You Will Discover (long-tail keywords and search phrases)] [Key Topics] + [Ideal Audience] + [Performance (long-tail keywords and search phrases)] Conclusion Now that you’ve mastered Pinterest descriptions. Remember this if you remember nothing else about creating the finest Pinterest descriptions:

How to Write the Best Pinterest Descriptions for Boards and Pins Read More »